

Are you looking to elevate the look of your Ford F150 Raptor with brighter, more efficient headlights? Look no further!
This guide will help you upgrade your headlights using LED bulbs to bring a modern, sophisticated look to your beloved ride. Taking mere minutes to install, you can make major upgrades quickly and easily.
LED bulbs offer safer, brighter, and more efficient driving. Upgrading your Ford F150 Raptor headlights to LED Bulbs provides an easy two-minute solution to increasing visibility while providing an unbeatable level of style.
Before you upgrade your Ford F150 Raptor headlight bulbs to LED bulbs it’s important to understand the technology behind LED bulbs, why they are so beneficial and the process behind a successful upgrade.
This guide will provide a comprehensive overview of the advantages of upgrading your headlights to LED lights, step-by-step instructions for powering up LEDs on your Ford F150 Raptor and how to pick according to performance. Additionally, we will provide troubleshooting tips in order for you make the best use of these powerful beasts.
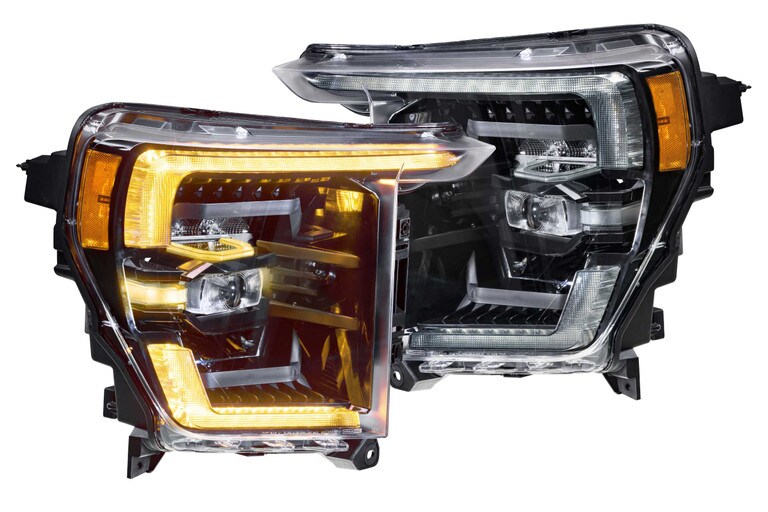
Choosing LED Headlights
Replacing conventional halogen light bulbs with LED bulbs in your Ford F150 Raptor’s headlights is a great way to bring a fresh, new look to your vehicle. LED Headlights are brighter and last longer than their halogen counterparts, giving you a more reliable performance while you drive.
When it comes to selecting the right LED bulbs for your Ford F150 Raptor, there are some important factors to consider. Brightness, color temperature, beam pattern and size are all important considerations that can help you determine which LED headlight bulb is best for you.
Brightness: If you’re looking for replacement LED headlights that provide superior brightness compared to factory ones, then look no further than Lumen’s selection of LED Headlight Bulbs. They offer different wattages ranging from 30W all the way up to 50W depending on what the installation requirements dictate for your truck. The higher number indicates a brighter performance that can help you see farther in even the darkest of nights.
Color Temperature: The second factor to consider when selecting headlights is color temperature; this dictates the tint of the light emitted from headlights and will determine what color light illuminates from them when turned on. For most vehicles, 6000K or 8000K is recommended as these provide coolest-looking lights and also have excellent visibility at night time due to improved visibility for drivers in dark conditions.
Beam Pattern: It’s also important to consider beam pattern when changing headlights out – this will determine how wide or narrow the spread of light will be when on and aiming correctly down the road; wider patterns allow better peripheral lighting whereas narrow patterns allow more direct lighting straight ahead with less peripheral illumination. Be sure to verify compatibility with your current headlight housing before purchasing new replacements as some may not fit properly if they’re not an exact match in terms of size and shape components compatible with your truck model year model year vehicle type/sub-model and type/specifications stated by manufacturer guide specification sheets within user manuals or websites where applicable.
Size: Lastly when choosing replacement LED lights it’s important to keep size in mind as well – too small or too large headlights won’t fit into existing housings without additional modifications; ensure that whatever heads are chosen match exactly what was originally installed by manufacturer so as avoid bending/breaking components during installation process or potential non-compliance issues due later down line with law enforcement who verify proper lamp/lighting equipment compliance standards defined local region DUI/safety laws governing street driving standards according state departments transportation inspection regulations schedules year models go inspected every 1-2 years time for protocol updates detect violations deemed unsafe public use etcetera…

Researching brands and reviews
One of the most important aspects of upgrading your Ford F-150 Raptor’s headlights with LED bulbs is researching the brands and reading reviews from people who have already tried them. Thankfully, the internet makes this process quite easy.
You should look for reviews from people who have already had success with installing these bulbs in their truck, as well as ratings from people who have used them for some time. This will give you an idea of which brands have the best performance and which ones are most reliable, allowing you to make an informed decision when it comes time to choose a bulb for your truck.
Depending on your budget and performance needs, you can look at a variety of options to find what will work best for you.
Selecting the right size for your F150 Raptor
Selecting the right LED size for your F150 Raptor’s headlights will ensure a perfect fit and reliable performance while driving. When upgrading to LED bulbs, it is important to match the size of your current lights, as the size determines which type of bulb you need. In the case of the F150 Raptor, the stock lighting configuration requires a H4 (9003) bulb for High/Low beam upgrades. Depending on other parts you may have installed, there are several other alternate sizes available. For example, many of these trucks come with additional lighting configurations such as fog lights which are purchased as aftermarket upgrades. If this is the case, selecting one of these alternate sizes may be beneficial when upgrading your headlights or replacing bulbs in other areas of your vehicle.
Following is a list outlining some of the common bulb sizes used by Ford on the F150 Raptor:
– H4 (9003): This is most commonly applied to the High/Low Beam configuration that comes with most Raptors and typically requires two bulbs per assembly.
– H3 (HB2): This can be used in additional lighting applications such as spotlights or fog lights depending on what equipment has been installed in your truck as an upgrade. This type typically requires two bulbs per assembly but occasionally will require only one bulb; please consult a professional if unsure about your specific application before purchasing new bulbs
– 9006/HB4: These bulbs are primarily used for aftermarket upgrade fog light kits and are designed for low voltage operation; use only a 12v 9-16 volt capable LED when installing this application
– D3S / D2S: These types are generally found on more high end rigs that feature headlight projector mechanisms; these bulbs utilize an HID Xenon gas discharge technology and require very specific wattage specifications and care during installation to avoid damaging components
Preparing for Installation
Proper preparation is the key to a successful installation process, so take your time and make sure you have all the necessary items before getting started. The LED conversion kit for Ford F150 Raptor headlights comes with everything you need to upgrade your vehicle’s lighting system, including a wiring harness and mounting bracket. These components ensure a secure and proper fit in the truck.
Additionally, it is recommended that you clean the headlight housing of any dust or debris prior to installation. Wearing work gloves is also recommended to protect your hands from any potential hazards that may occur during installation.
Lastly, make sure to read through the instructions completely before beginning the process — they will provide valuable insight on how correctly install the LED bulbs into your Ford F150 Raptor headlights.
Gathering the necessary tools
Before beginning any sort of modification to your vehicle, it’s always important to gather the necessary tools and supplies. Depending on your type of Ford F150 Raptor, there may be slight variations in the tools you’ll need. Generally, when installing LED bulbs, you’ll need the following items:
- LED bulbs (made specifically for your F150)
- Small flathead screwdriver or a T20 Torx screwdriver
- Gloves (for protection against sharp edges and hot components)
- Shop Rags (to help keep components clean)
- New dust caps to protect sealed bulbs (if applicable)
- Optional: Thermal paste to fill any voids on the back of the bulb once installed
It is also advised that you read up on any applicable regulations and safety procedures related to working with electrical parts in order to avoid any unnecessary risks. Additionally, having an automotive repair manual that covers specific details associated with your Ford is recommended for reference. Now that you have all of your tools gathered together and you are well informed about safety precautions, let’s jump into our how-to guide for LED headlights installation!
Disconnecting the battery
Before starting the installation process, you must disconnect the battery in your Ford F150 Raptor. This is an important step to ensure that you do not damage the electrical system of your vehicle.
Make sure that all of the car’s doors and windows are closed as you will need to open them to access the negative terminal bolt on the battery. You should also wear safety glasses when doing this procedure as sparks can be produced when disconnecting a live power source.
Once disconnected put your battery saver switch into “off” mode and make sure that it is not accidentally flipped on during installation.

Removing the existing headlights
Removing the existing headlights from your Ford F150 Raptor is a relatively simple process, but it does require the right tools. Before you get started, gather up the tools and materials you will need for this job. These items include: masking tape, screwdriver, flashlight, razor blade and new LED headlight bulbs (if applicable).
Start by opening the hood on the Ford F150 Raptor. Once that’s done, locate the headlight assemblies. The assembly is located behind a plastic panel at each end of the engine bay. Using a flashlight to locate it if necessary.
Once you have identified where they are located use a razor blade to carefully cut away any masking tape that may be covering them and then use a screwdriver to undo any screws that may be securing them in place. You should then be able to slide each headlight assembly out from their mountings.
You will now need to disconnect the wiring harnesses for each headlight and remove them from their mounting brackets at both ends of the vehicle. Some vehicles also require certain clips or screws to be detached before you can proceed with this step – make sure to check your owners manual for more information about how this varies from model year additions or specific trim packages. Lastly, unplug any bulbs that are not LED type being used in your upgrade from their sockets before finally removing the existing headlights own entirely form your Ford F150 Raptor once removed dispose of them responsibly in accordance with local regulations and guidelines ruled out by local law enforcement agencies or government bodies where applicable.
Installing the LED Headlights
Now that you have chosen the right LED headlights for your Ford F150 Raptor, it’s time to install them. This process will require basic mechanical tools and knowledge of wiring. Please adhere strictly to all safety guidelines during the installation process.
Begin by unplugging the factory wiring harness from your existing headlights and removing the OEM bulbs from their housings. Place the new LED headlights into position and securely fasten them to their housing with a screwdriver or drill. Ensure that each LED bulb is tightly fitted into its casing for optimal performance.
Next, you need to connect your new LED bulbs to a power source. If you are replacing just one of the OEM headlight bulbs, you will need an adapter plug so that both lights can run simultaneously at proper voltage levels. To ensure a secure connection, use waterproof silicone sealant for extra protection against rain or moisture damage. You may also need an external ballast if required by specific models or brands of led lights, as this will help maintain voltage consistency throughout the system and protect your vehicle’s electronics from malfunctioning due to excessive current draw of LED components.
Once everything is in place, test out your headlights by turning them on in low beam as well as high beam mode to make sure they are working correctly and producing enough light at night time driving conditions. After confirming that they are functioning properly, complete the installation process by thoroughly cleaning up any residual silicone sealant and wiring connections with a damp cloth before closing up the hood again. Congratulations – you have successfully installed enhanced LED lighting on your Ford F150 Raptor!
Connecting the new headlights
Outfitting your Ford F150 Raptor with LED headlights is an easy and cost effective way to upgrade your lights and visibility while driving. This guide will walk you through the steps of connecting the new lights to your vehicle.
Before getting started, it’s important to know that not all LED bulbs are the same size as traditional ones. The Ford F150 Raptor requires bulbs that can be sized up or down depending on how you would like the light customized. Additionally, some vehicles might require more than one bulb type, so make sure you check the compatibility before purchase.
Once you’ve chosen your new LED bulbs and have them in hand, it’s time to mount them in your vehicle. To do this, begin by parking it on level ground and make sure the engine is off for safety purposes. Open the hood and locate the headlight assemblies; these are usually located either on both sides or one side of the hood itself. Unscrew any screws that hold them in place, then take out each part carefully by gently pulling them apart from their base until they become disconnected.
Next, pull out each old bulb from its respective socket with caution so as not to damage any other wiring or components inside. Be sure to keep these together so they can be recycled safely when finished with installation. Now place each LED bulb where appropriate; making sure that plus ends line up with plus ends and minus ends with minus ends (this should be labeled). Securely attach each bulb back into its socket then repeat this step for all remaining parts of headlight assembly before re-connecting them back into their mirrors/brackets/mounts accordingly once again making sure they don’t become unhinged while driving; finally screw them back into place using a socket wrench if necessary when finished completely connect subpanels such as those found underneath mirrors if applicable before closing hood!
Securing the new headlights in place
Using the included screws, secure the replacement LED headlights into place. It is important to only tighten them until they are snug — you don’t want to over-tighten the screws or they could break. Once they are tightened, check again with a ratchet or wrench to ensure that they are properly tightened.
Place the plastic trim around the edges of the headlights and make sure it is secured in position and locked down tight. This will not only protect your new headlights from damage while driving, but also give your truck a more professional look.
Adjusting the beam pattern
In order to enjoy the full benefits of LED bulbs in your Raptor headlights, you need to adjust the beam pattern. This requires removing the headlight assembly and detaching the existing bulbs. Be sure to be careful and follow any cautionary steps noted in your owner’s manual before attempting this adjustment.
Once complete, re-attach the LED bulbs to the headlight assembly by taking appropriate measures not to touch any of the glass components. Aiming the beams is done by moving each bulb in an up-down or side-to-side motion until they are precisely where you want them, ensuring that they will provide adequate visibility while driving while avoiding blinding other drivers.
Conclusion
In conclusion, upgrading to LED headlights for your Ford F150 Raptor can be a great way to make your truck look more modern, while also providing better illumination on the road. LEDs are brighter and more efficient than the standard halogen bulbs that come with your vehicle and they use less power too. When installing them, it is important to take care to ensure they are mounted securely. Additionally, research which bulbs are compatible with your truck before purchase to avoid damaging any components.
With proper installation and use, you should enjoy brighter headlights for a long time – potentially lasting up to 50 000 hours or about 5 years; ultimately saving you money in the long run!
FAQ’s
Can I put LED headlights in my F-150?
Yes, you can put LED headlights in your F-150.
Can you replace factory headlight bulbs with LED?
Yes, you can replace factory headlight bulbs with LED.
How do you change a Ford F150 stock heads with LED bulbs?
You can change a Ford F150 stock heads with LED bulbs by following the instructions provided in the LED bulb kit.
Is it worth upgrading car headlights to LED?
Yes, it is worth upgrading car headlights to LED as they provide better visibility and last longer than traditional halogen bulbs.
Do you need a conversion kit for LED headlights?
Yes, you need a conversion kit for LED headlights as they require a different wiring system than traditional halogen bulbs.
Which F-150 trim has LED headlights?
The F-150 Platinum, Limited, and Raptor trims have LED headlights.
Can I use LED instead of HID headlights?
Yes, you can use LED instead of HID headlights, but you may need to make some modifications to your vehicle’s wiring system.
Why not to use LED headlights?
LED headlights can be more expensive than traditional halogen bulbs and may require modifications to your vehicle’s wiring system.
Are LED headlights as bright as HID?
LED headlights can be as bright as HID headlights, but it depends on the specific bulb and manufacturer.
Why are Ford truck headlights so bright?
Ford truck headlights are designed to provide better visibility and safety for drivers, especially when driving in low-light conditions.
See Also: